
Online Payment Q & A
1. How to Register
2. How to Create a Payment Method
3. Things to Remember When Making a Payment
4. How to Make a Payment
5. Things to Remember before Setting Up Recurring Monthly Payments
6. How to Set Up Recurring Monthly Payments
7. How to Cancel Recurring Payments
8. Things to Remember before Scheduling a One-Time Only Deferred Payment
9. How to Schedule a One-Time Only Deferred Payment
10. Things to Remember before Scheduling Automatic Payments
11. How to Schedule Automatic Payments
12. How to Reset Expired Password
13. How to Retrieve Username
14. How to Create a New Password
15. How to View Payment History
- 1. How to Register
- As a first time user you will be required to register before you can make a payment.
-
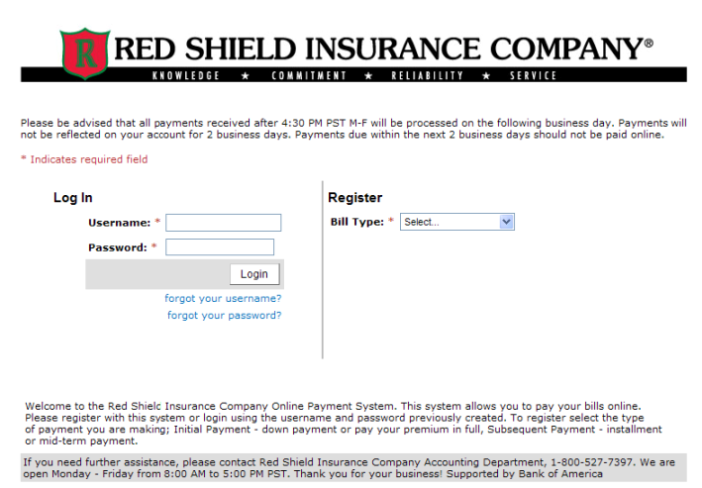
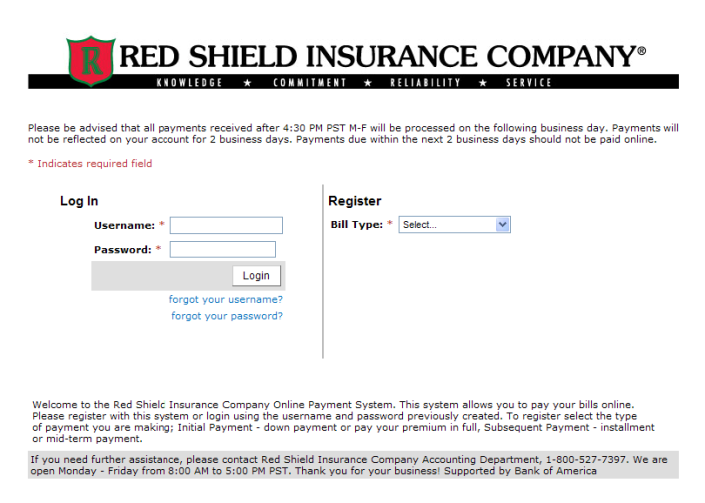
1. Click the Pay Your Bill Icon
- This will take you to the Login-Registration Screen
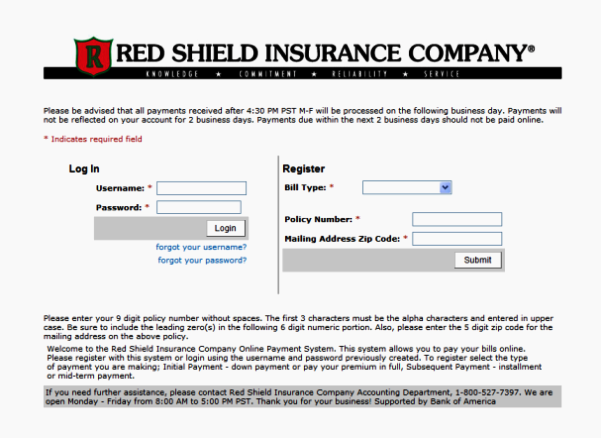
- Begin the Registration process by entering the following information:
- Select Bill Type: Initial Payment if you are making a down payment or full payment on a new policy or renewal, Subsequent Payment if you have already made your down payment and are making a monthly installment payment or payment for a mid-term endorsement.
- Enter your policy number without any spaces between the letters and numbers.
- Enter your billing zip code only.
- NOTE:
Once you have completed steps 2 through 4 click the Submit button to create an Account Profile. The account profile is where you will create a Username and Password, and set up a Security Question. The security question is needed in case you forget your username or password.
If you wish to receive electronic confirmation, remember to enter your email address and check the" Email Delivery Option" box when creating your account profile.
You will use your username and password to log into the site to make payments, edit your account profile and to check your payment history.
If you need to update your mailing address or modify coverage, please submit a request through your agent. Your address and contact data on the ACH (Online Payment System) are solely for payment purposes and are separate from your policy record information.
The username information and all online bill pay activity are followed by an electronic message to the email address on file in the account profile if the "Email Delivery Option" is selected. The password is not included in the email.
Click the Log Out tab at the top of the screen to log out of the system.
- 2. How to Create a Payment Method
- Before you can set up Recurring Payments or Schedule a Payment, you must create a Payment Method. A payment method stores your bank account information for future use.
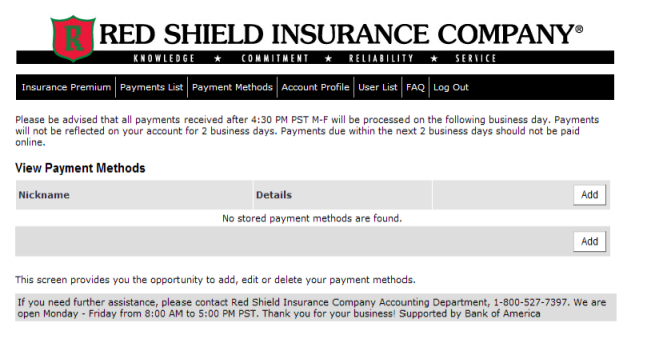
- Once you have logged into the ACH (Online Payment System) website, click on the Payment Methods tab at the top of the screen.
- Click Add to create a payment method.
- Create a Nickname and select your Payment Type (Personal Checking, Personal Savings, or Business Checking). Your name and billing address will already be filled in.
- The nickname field is where you will create a name to hold your bank account information. Example: Name01. If you are planning to schedule a payment for a future date or set up recurring monthly payments, you must have a saved payment method.
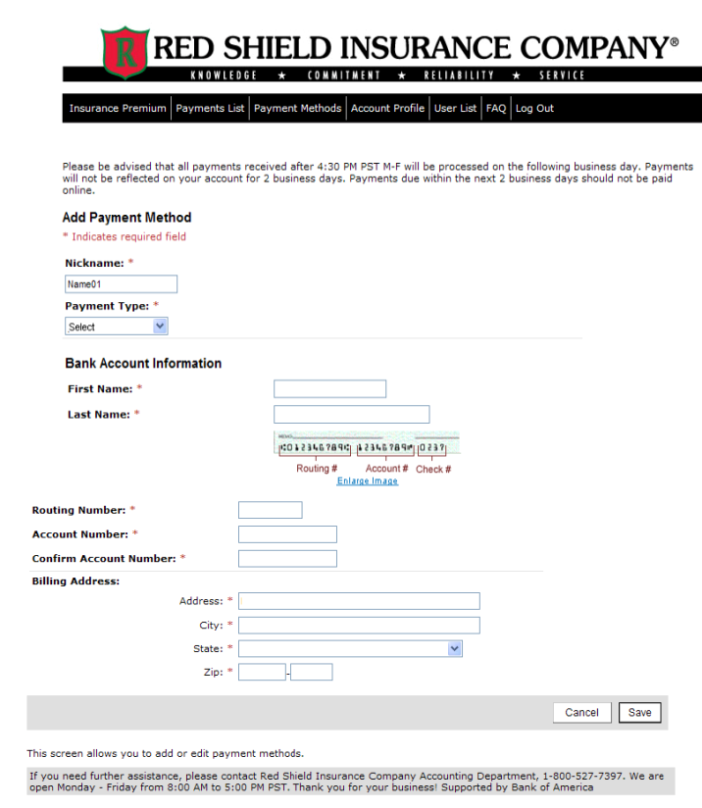
- Enter your Bank Routing Number and Bank Account Number then click the save button.
- Click on the Insurance Premium tab at the top of the screen to make a payment.
- 3. Things to Remember when Making a Payment
-
- Remember to check the box under Check to Pay.
- Make sure the amount in the Amount to Pay field is the amount you want to pay.
- Make note in the Comments field if you are paying an amount that is different from the amount due. Example: This amount is for two payments.
- Do not Schedule a Payment if you are making a payment past your payment due date.
- The Nickname field is where you will create a name to hold your bank account information. Example: Name01
- NOTE:
We only accept ACH payments at this time. You can set this up to draw from your personal checking or savings account(s), or from your business checking account. ACH is a banking industry term which stands for Automated Clearing House; in other words, it is an electronic way to transfer client funds between businesses and banks.
Payments for policies in cancellation status must be made a least two (2) business days prior to cancellation effective date. Renewal payments must be made at least two (2) business days prior to policy renewal date.
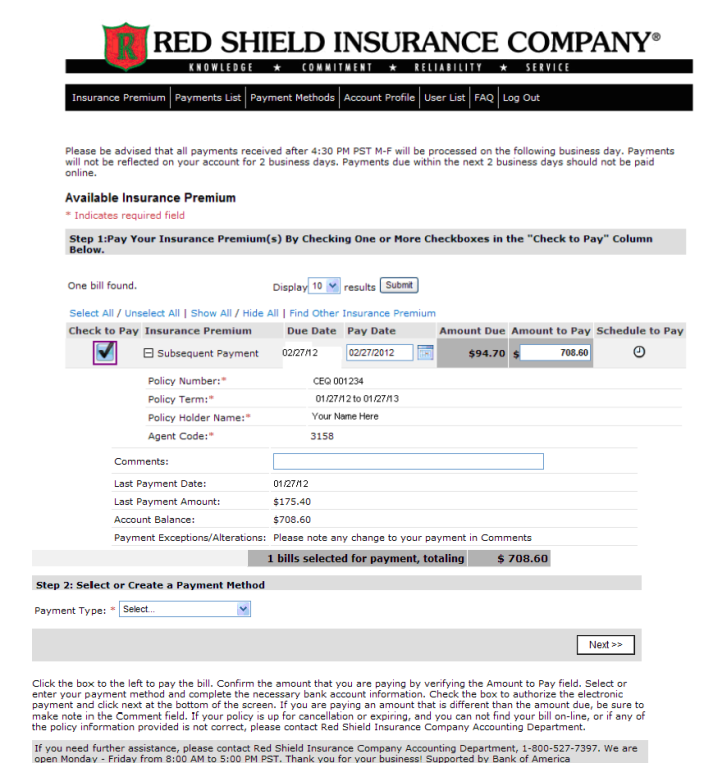
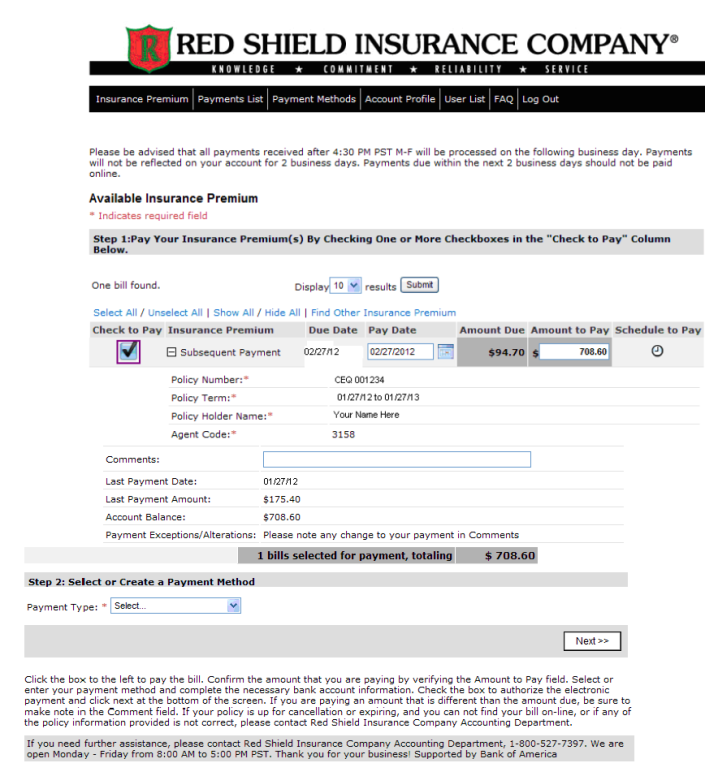
If you wish to change the Amount to Pay to an amount greater than what is due, click in the Amount to Pay field to change the amount.
When making multiple payments for a single policy make note in the comments field to avoid the payment being applied as one payment.
If you are making your initial down payment, you must wait until you receive your first installment bill before making an installment payment or setting up recurring payments. Our program can only accept one payment amount. When you receive your first installment bill, you can log into the website to make your installment payment, set up recurring payments or schedule a payment.
A $20 NSF fee will be added to your account if a payment is returned by the bank as Non-Sufficient Funds or Account Closed.
If the amount due is not paid in full by the payment due date, a notice of cancellation will be mailed. If the amount due is not paid by the payment due date, a notice of cancellation will be mailed.
You can pay for more than one policy at one time if the Named Insured is exactly the same on both policies. Otherwise, click on the Find Other Insurance Premium menu option under Step 1 to find other insurance premium.
If you have received a notice of cancellation, you will need to change the amount in the Amount to Pay field to the amount shown on the cancellation notice.
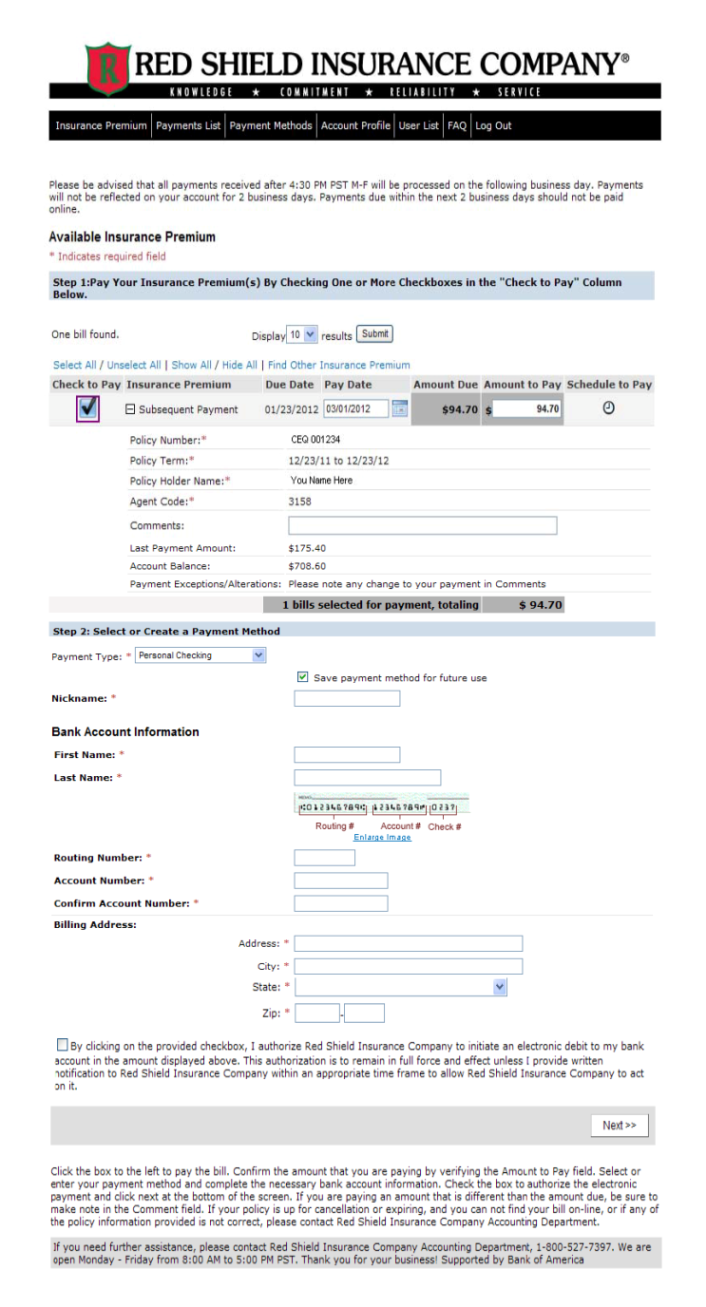
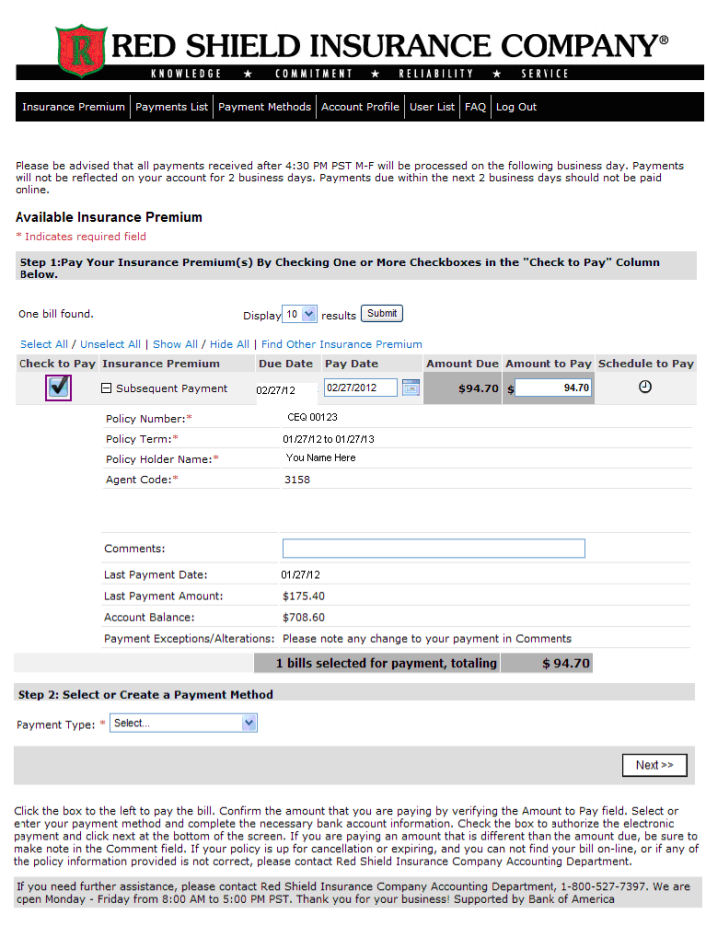
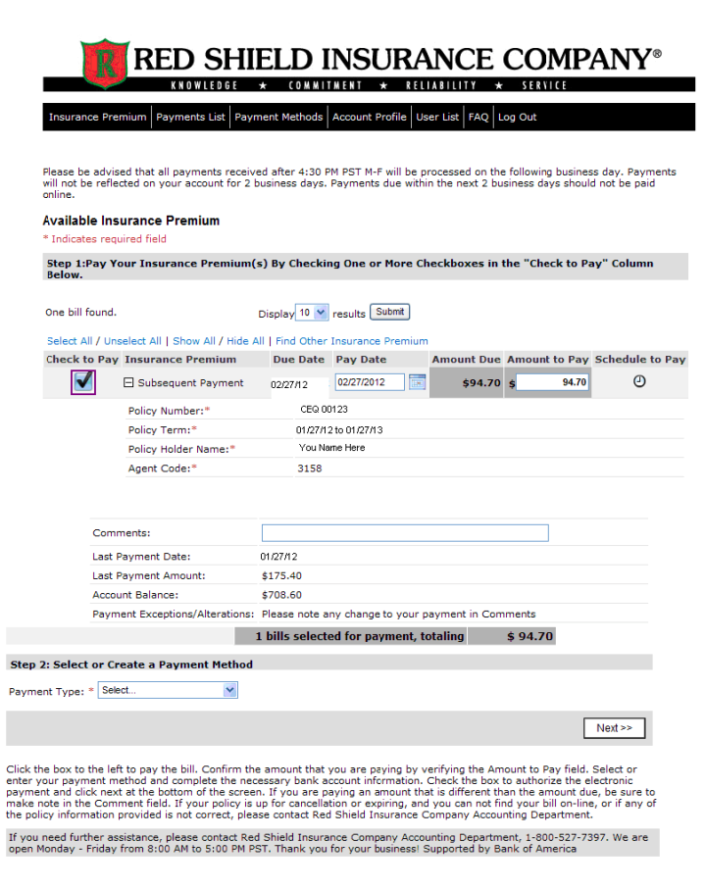
- 4. How to Make a Payment
- Once you have registered and set up an account profile you can make a payment.
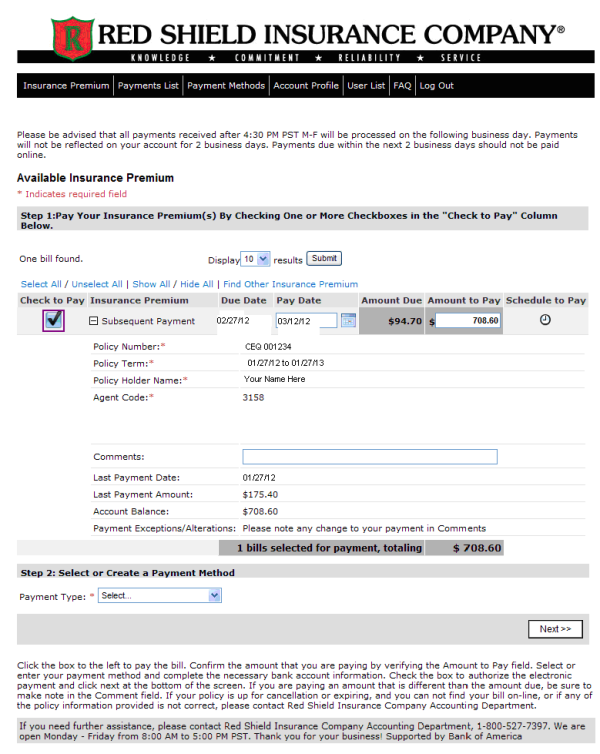
- On the Available Insurance Premium screen, click the box under Check to Pay. A check mark will appear in the box and the Amount to Pay field will be filled in with the amount due.
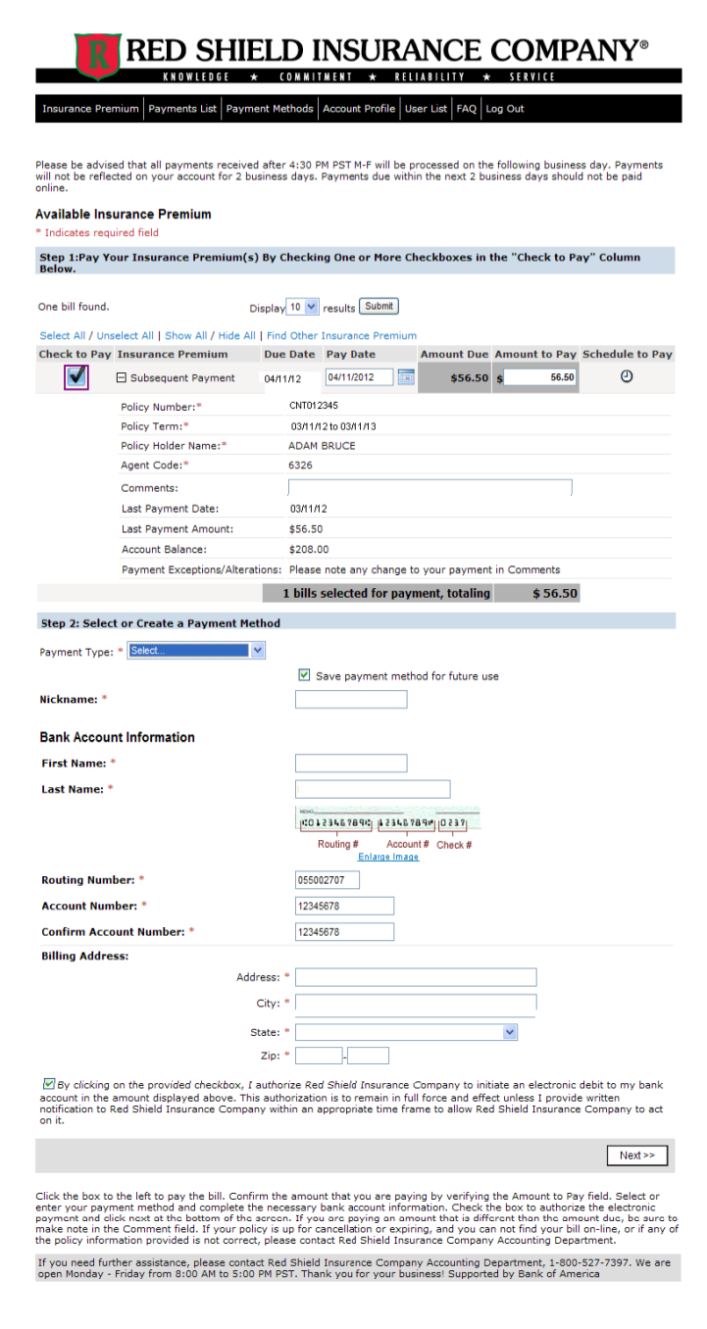
- Scroll down to Step 2: Select or Create a Payment Method and select the Payment Type (Personal Checking, Personal Savings, or Business Checking).
- Create a Nickname to save your bank account information for future transactions or uncheck the box next to Save Payment Method for Future Use if you do not wish to save your bank account information.
- Enter your Bank Routing Number and Bank Account Number.
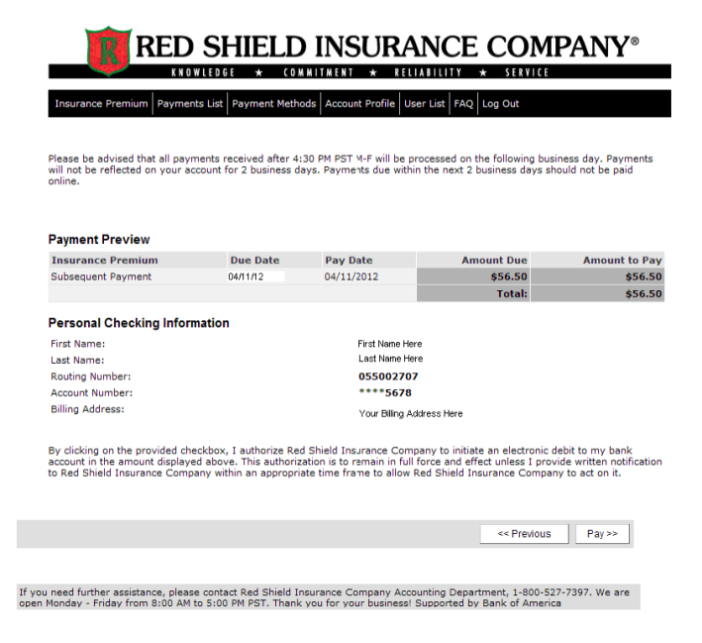
- Check the box in the bottom left corner of the screen to authorize Red Shield Insurance Company to initiate an electronic debit to your bank account in the amount displayed in the Amount to Pay field. Click Next to preview payment.
-
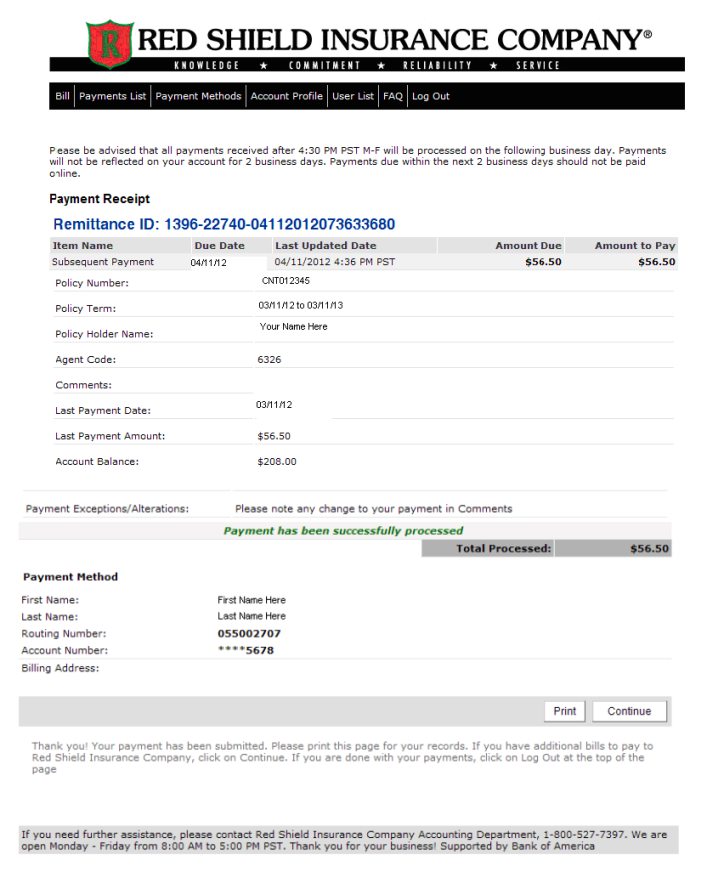
- Once you have reviewed the payment, click the Pay Button to make your payment.
-
If your payment was made successfully, you will be routed to the Payment Receipt screen.
- NOTE:
If you checked the "Email Delivery Option" box when you created your account profile, a confirmation of payment email will be sent to the email address in your profile. If you did not sign up for electronic email confirmation, please print this screen for your records.
Payments submitted by 4:30 pm (PST) M-F are processed the same business day and will appear on your account in two (2) business days. Payments made after 4:30 pm (PST) M-F are processed the following business day, and are reflected two (2) business days afterward.
Payments made thru ACH will be labeled on your bank records as "Red Shield Insurance Company".
If you have made a payment through ACH (Online Payment System) but your billing does not show payment as being received, you can log into the ACH website and click on the Payments List tab at the top of the screen to check payment status. If the payment listed shows "Processed" to the left, it has been submitted; your billing may have been mailed prior to the payment being received. If it shows "Pending" it has not been submitted yet and you may need to edit the payment so it will be submitted on time (click on the "Edit" option to the right of the screen). If your payment listed shows "Pending" but there is no "Edit" option to the right of the screen, you will need to Cancel the pending transaction and resubmit your payment. If the payment listed shows "Failed", the payment has not been made and you will need to resolve the problem and resubmit your payment.
As long as there is a balance still outstanding, you will receive a monthly billing, even though you are making your payments though the ACH (Online Payment System) website. Click the Log Out tab at the top of the screen to log out of the system.
- 5. Things to Remember before Setting Up Recurring Monthly Payments
- The Recurring Payments option allows you to set up a recurring fixed amount for a selected payment due date. The recurring fixed amount will be deducted from your bank account monthly and applied to your insurance premium.
- Remember to create a Payment Method before you set up recurring payments. A Payment Method stores your bank account information for future use. Click on the Payment Method tab at the top of the screen to create a payment method.
- Once you have created a payment method click on the Insurance Premium tab at the top of the screen to take you back to the Available Insurance Premium screen to make a payment.
- Remember to click on the box under Check to Pay. This will put a check mark in the box and fill in the Amount to Pay field with the monthly installment amount.
- Click on the Schedule to Pay icon to set up recurring payments.
-
NOTE:
Your account must be current before you can set up recurring payments.
Recurring Monthly Payments set up after your payment due date will not be processed until the following month.
If you make a billing address change after you have set up recurring payments, you will need to cancel the recurring payment plan and set up a new one. Your billing information must match the existing automatic payment plan information in order for the bank to pull your payment.
- 6. How to Set Up Recurring Payments
- After you have set up a Payment Method, you can set up Recurring Monthly Payments.
- On the Available Insurance Premium screen, check the box under Check to Pay then click on the Schedule to Pay icon.
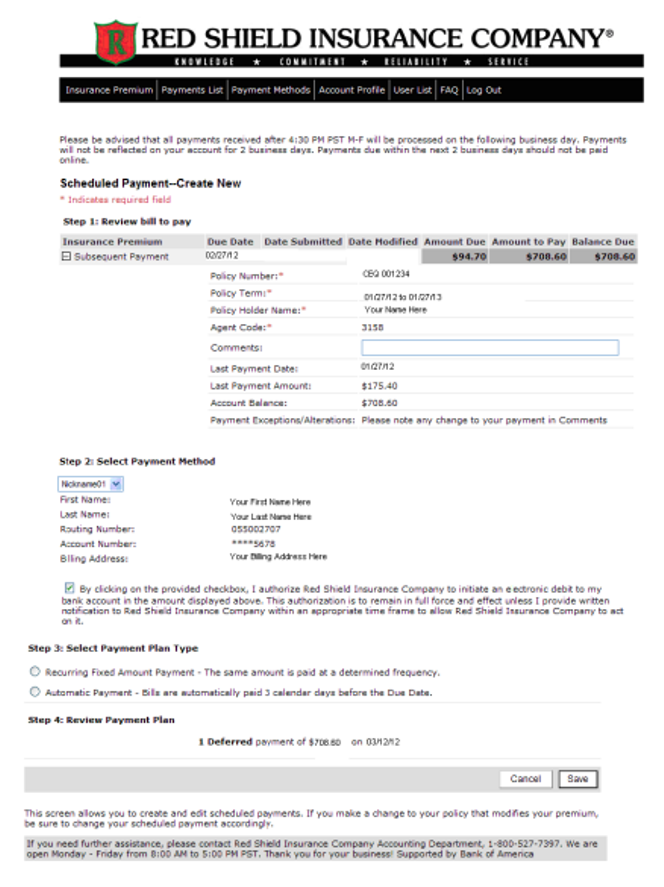
- This will take you to the Scheduled Payment-Create New screen where you will set up Recurring Monthly Payments.
- Step 1: Review Bill to Pay will already be filled in. Review information to make sure it is correct.
- Click on the drop down arrow in the Select Payment Method field. Click on the Nickname you created when you set up your payment method. Your bank account information will automatically be filled in.
- Check the box on the left side of the screen that authorizes Red Shield Insurance Company to initiate an electronic debit to your bank account in the amount displayed in the Amount to Pay field.
- Select the Recurring Fixed Amount Payment option to set up recurring payments.
- Under the Select Payment Plan Frequency select Monthly and pick a date at least three (3) days prior to your monthly installment payment due date.
- NOTE:
Recurring payments must be set up at least three (3) days prior to the installment payment due date.
If you make a billing address change after you have set up recurring payments, you will need to cancel the recurring payment plan and set up a new one. Your billing information must match the existing recurring payment plan information in order for the bank to pull your payment.
If you checked the "Email Delivery Option" box when you created your account profile, a confirmation of payment email will be sent to the email address in your profile. If you did not sign up for electronic email confirmation, please print this screen for your records.
Payments submitted by 4:30 pm (PST) M-F are processed the same business day and will appear on your account in two (2) business days. Payments made after 4:30 pm (PST) M-F are processed the following business day, and are reflected two (2) business days afterward.
Payments made thru ACH will be labeled on your bank records as "Red Shield Insurance Company". If you have made a payment through ACH but your billing does not show payment as being received, you can log into the ACH website and click on the Payments List tab at the top of the screen to check payment status. If there is a payment listed that shows "Processed" to the left, it has been submitted; your billing may have been mailed prior to payment received. If the payment listed shows "Pending" it has not been submitted yet and you may need to edit the payment so it will be submitted on time (click on "Edit" to the right of the screen). If the payment listed shows “Pending” but there is no “Edit” option to the right of the screen, you will need to Cancel the pending transaction and resubmit your payment. If the payment listed shows "Failed", the payment has not been made and you will need to resolve the problem and resubmit your payment.
As long as there is a balance still outstanding, you will receive a monthly billing, even though you are making your payments though the ACH (Online Payment System) website. Once your policy has been paid in full you will need to cancel your recurring payment option. Click the Log Out tab at the top of the screen to log out of the system.

- 7. How to Cancel Recurring Payments
- If you have set up Recurring Payments, once your policy is paid in full you will need to cancel your recurring payments option.
- Log into the Online Payment System ACH website.
- Click on the Payments List tab at the top of your screen.
- Under the Status field locate the current pending transaction. The pending transaction represents the next scheduled Monthly recurring payment.
- Move your cursor over to the Action field and click cancel. A pop-up screen will appear to confirm that you would like to cancel your Monthly recurring payment plan.
- NOTE:
It is important to cancel your Monthly Recurring Payment plan once your policy is paid in full. The ACH (Online Payment System) does not automatically stop payment deductions from your bank account once your policy has been paid in full for the current policy term.
Click on the Log Out tab at the top of the screen to log out of the system.

- 8. Things to Remember before Scheduling a One-Time Only Deferred Payment
- By using the calendar next to the pay date field you can schedule a One-Time Only payment. The calendar option allows you to schedule a payment to be paid on the date you select.
Please beware a date selected after your due date may cause a notice of cancellation to be sent. - Remember to create a Payment Method before you Schedule a Payment. A Payment Method stores your bank account information for future use. Click on the Payment Method tab at the top of your screen to create a payment method.
- Once you have created a payment method click on the Insurance Premium tab to take you back to the Available Insurance Premium screen.
- Remember to click on the box under Check to Pay. This will put a check mark in the box and fill in the Amount to Pay field with the payment amount.
- If you wish to Schedule a Payment for more than the amount due click in the Amount to Pay field to change the amount.
- If you are scheduling your initial down payment and wish to pay the total premium, click on the Amount to Pay field to change the amount.
- Click on the Calendar next to the pay date field to select the date you wish your payment to be made.
-
NOTE:
A scheduled deferred payment is a One-Time Only payment.
If you make a billing address change after you have scheduled a deferred payment, you will need to cancel the scheduled payment plan and set up a new one. Your billing information must match the existing scheduled payment plan information in order for the bank to pull your payment.
Schedule your deferred payment for at least two (2) days before the payment due date to insure payment is received on time.
If your payment is past the payment due date, do not schedule a payment.
- 9. How to Schedule a One-Time Only Deferred Payment
- After you have set up a Payment Method, you can Schedule a Payment.
- On the Available Insurance Premium screen, check the box under Check to Pay then click on the Calendar next to the pay date field to select a pay date.
- Once you have selected a pay date, click on the Schedule to Pay icon.
This will take you to the Scheduled Payment-Create New screen.- Step1: Review Bill to Pay will already be filled in.
- In Step 2: Select Payment Method, click on the drop down arrow and click on the Nickname you created when you set up your payment method.
- Check the Box to authorize Red Shield Insurance Company to initiate an electronic debit to your bank account in the amount displayed in the Amount to Pay field.
- Scroll down to Step 4 to review the scheduled one-time only deferred payment plan.
- Click the Save button to complete the transaction.
- NOTE:
If you make a billing address change after you have scheduled a one-time deferred payment, you will need to cancel the one-time deferred payment plan and set up a new one. Your billing information must match the existing deferred payment plan information in order for the bank to pull your payment.
Do not schedule a deferred payment if the payment you are making is past due.
If you checked the “Email Delivery Option” box when you created your account profile, a confirmation of payment email will be sent to the email address in your profile. If you did not sign up for electronic email confirmation, please print this screen for your records.
Payments submitted by 4:30 pm (PST) M-F are processed the same business day and will appear on your account in two (2) business days. Payments made after 4:30 pm (PST) M-F are processed the following business day, and are reflected two (2) business days afterward.
If you have made a payment through ACH (Online Payment System) but your billing does not show payment as being received, you can log into the ACH website and click on the Payments List tab at the top of the screen to check payment status. If there is a payment listed that shows “Processed” to the left, it has been submitted, your billing may have been mailed prior to the payment being received. If the payment listed shows “Pending”, it has not been submitted yet and you may need to edit the payment so it will be submitted on time (click on “Edit” to the right of the screen). If your payment listed shows “Pending” but there is no “Edit” option to the right of the screen, you will need to Cancel the pending transaction and resubmit your payment. If the payment listed shows “Failed”, the payment has not been made and you will need to resolve the problem and resubmit your payment.
As long as there is a balance still outstanding, you will receive a monthly billing, even though you are making your payments though the ACH (Online Payment System) website. Payments made thru ACH will be labeled on your bank records as "Red Shield Insurance Company". Click the Log Out tab at the top of the screen to log out of the system.
- 10. Things to Remember before Scheduling Automatic Payments
- You can set up your monthly installment payments to be automatically deducted from your account each month by selecting the Automatic Payment plan. The Automatic Payment plan will pay the amount of the Installment Bill each month.
-
- Remember to create a Payment Plan before you Schedule Automatic Payments. A Payment Method stores your bank account information for future use. Click on the Payment Method tab at the top of your screen to create a payment method.
- Once you have created a payment method click on the Insurance Premium tab to take you back to the Available Insurance Premium screen.
- Remember to click on the box under Check to Pay. This will put a check mark in the box and fill in the Amount to Pay field with the current installment bill amount.
- Click on the Schedule to Pay icon to schedule automatic payments.
- 11. How to Schedule Automatic Payments
- After you have set up a Payment Method you can Schedule Automatic Payments.
-
- On the Available Insurance Premium screen, check the box under Check to Pay. This will fill in the amount to pay screen with the current installment bill amount.
- Click on the Schedule to Pay icon.

This will take you to the Scheduled Payment-Create New screen.-
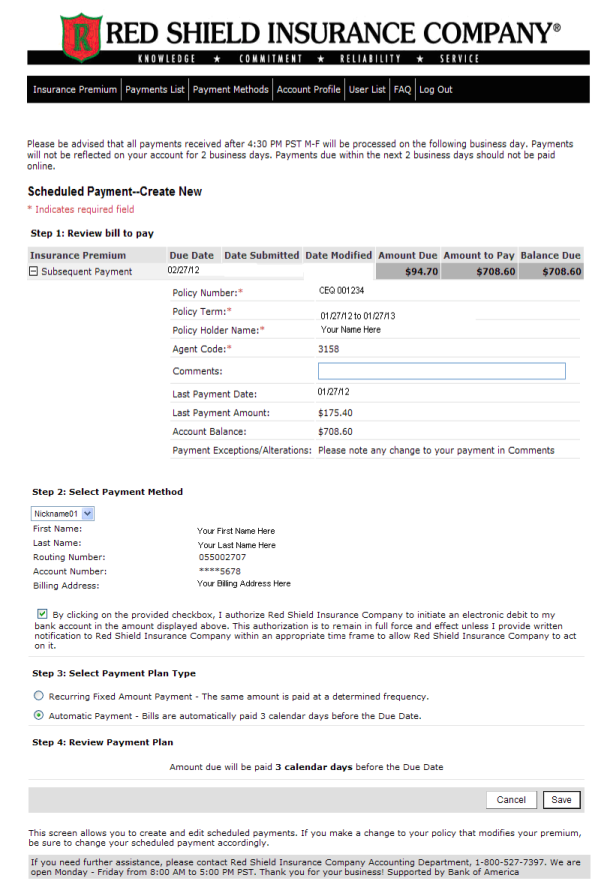
- In Step 1: Review Bill to Pay will already be filled in.
- In Step 2: Select Payment Method, click on the drop down arrow and click on the Nickname you created when you set up your payment method.
- Check the Box to authorize Red Shield Insurance Company to initiate an electronic debit to your bank account in the amount displayed in the Amount to Pay field.
- Scroll down to Step 3 to select payment plan type.
- Select Automatic Payment. Your monthly installment bill will be paid automatically three (3) calendar days before due date.
- Click the Save button to complete the transaction.
- NOTE:
If you make a billing address change after you have scheduled automatic payments, you will need to cancel the automatic payment plan and set up a new one. Your billing information must match the existing automatic payment plan information in order for the bank to pull your payment.
If you checked the “Email Delivery Option” box when you created your account profile, a confirmation of payment email will be sent to the email address in your profile. If you did not sign up for electronic email confirmation, please print this screen for your records.
Payments submitted by 4:30 pm (PST) M-F are processed the same business day and will appear on your account in two (2) business days. Payments made after 4:30 pm (PST) M-F are processed the following business day, and are reflected two (2) business days afterward.
If you have made a payment through ACH (Online Payment System) but your billing does not show payment as being received, you can log into the ACH website and click on the Payments List tab at the top of the screen to check payment status. If there is a payment listed that shows “Processed” to the left, it has been submitted, your billing may have been mailed prior to the payment being received. If the payment listed shows “Pending”, it has not been submitted yet and you may need to edit the payment so it will be submitted on time (click on “Edit” to the right of the screen). If your payment listed shows “Pending” but there is no “Edit” option to the right of the screen, you will need to Cancel the pending transaction and resubmit your payment. If the payment listed shows “Failed”, the payment has not been made and you will need to resolve the problem and resubmit your payment.
As long as there is a balance still outstanding, you will receive a monthly billing, even though you are making your payments through ACH (Online Payment System) website.
Payments made through ACH will be labeled on your bank records as "Red Shield Insurance Company".
Click the Log Out tab at the top of the screen to log out of the system.- 12. How to Reset Expired Password
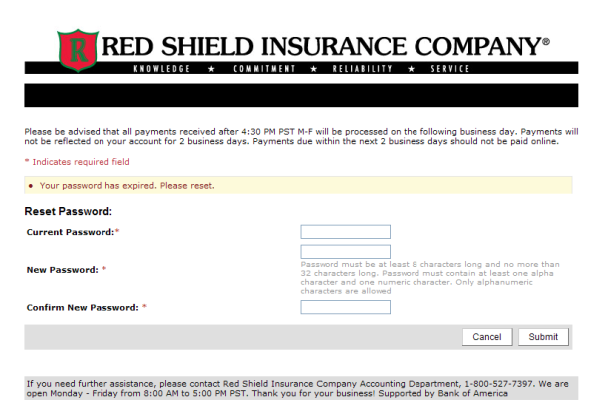
- The ACH website requires you to reset your password every 90 days for security reasons. Once you have entered your username and password, the system will prompt you to reset your password.
- Enter your current password (Your current password is the password you used to log in).
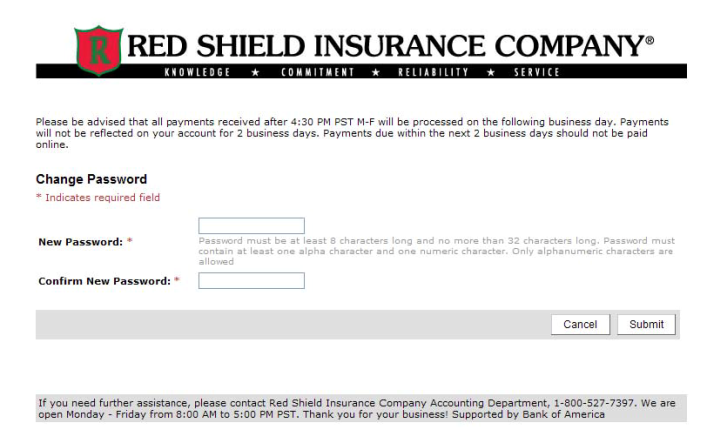
- Create a new password (The field under current password is where you enter your new password).
- 13. How to Retrieve Username
- If you have forgotten your Username you can retrieve your username by following two simple steps.
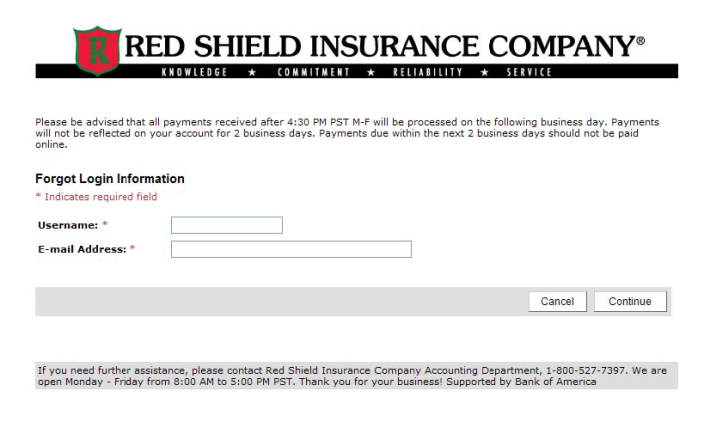
- From the Log In Screen, click on Forgot Your Username
You will be routed to the Forgot Log In Information screen.
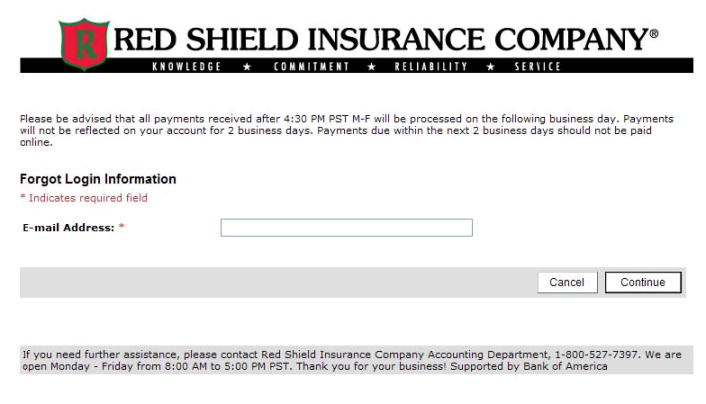
- Enter your Email Address.
- You will receive an email with your Username enclosed.
- 14. How to Create a New Password
- If you have forgotten your Password you can click on the Forgot Your Password link to create a new one.
-
- From the Log In screen click on Forgot Your Password.
-
- Enter your Username and Email Address.
-
- Enter your Security Answer to the Security Question you set up when you created your account profile.
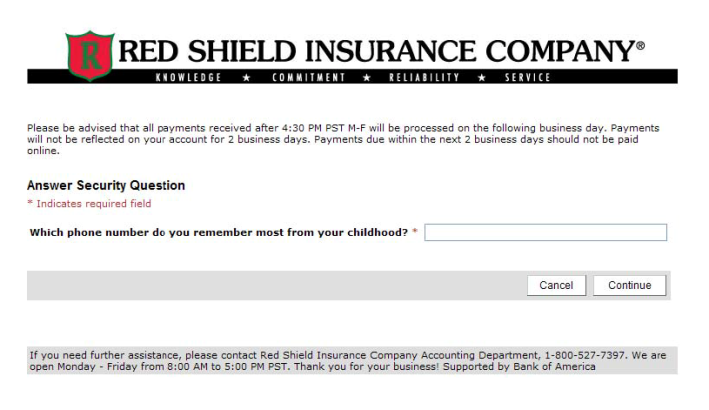
- Create a New Password.
- Confirm New Password by typing it exactly the same way a second time.
- 15. How to View Payment History
- You can review your Payment History or check the status of a Scheduled Payment by clicking on the Payments List tab at the top of your screen.
-
- To view a pending or processed transaction click on View under the Action field to the right of your screen.
- To edit a pending transaction click on Edit under the Action field to the right of your screen.
- To cancel a pending transaction click on Cancel under the Action field to the right of your screen.
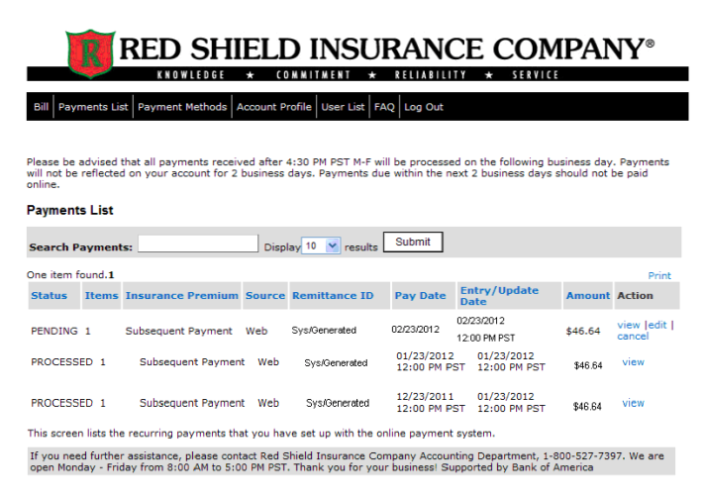
- You can View, Edit or Cancel a payment transaction in pending status.
Once a payment has been processed you can only view the transaction.
Click the Log Out tab at the top of the screen to log out of the system.
Contact our Accounting Department at (800) 527-7397 if you need assistance.
9755 SW Barnes Road
 •
Suite 390
•
Portland, Oregon
•
97225-6627
•
503.226.4146
•
800.527.7397
•
Suite 390
•
Portland, Oregon
•
97225-6627
•
503.226.4146
•
800.527.7397
©2015 Red Shield Insurance Company
NOTE:
If you make a billing address change after you have set up automatic payments, you will need to cancel the automatic payment plan and set up a new one. Your billing information must match the existing automatic payment plan information in order for the bank to pull your payment.